How to deploy a MERN full stack app on Render for free!
Looking for a place to deploy your MERN full stack app for free? Render’s free plan will let you deploy and test your app for free without even a credit card. I’ve got the steps right here to walk you through setup and get you going in under 10 minutes.
Create a Render account if you haven’t and connect your github account. You’ll need to do this to deploy your private repos.
Step 0: MongoDB Hosting
If you don’t have Mongo hosting yet, MongoDB Atlas is free, setup is easy and fast, and keeping your free app responsive is easier than self-hosting MongoDB on Render. I recommend using Atlas.
Step 1: Deploy your Node.js backend
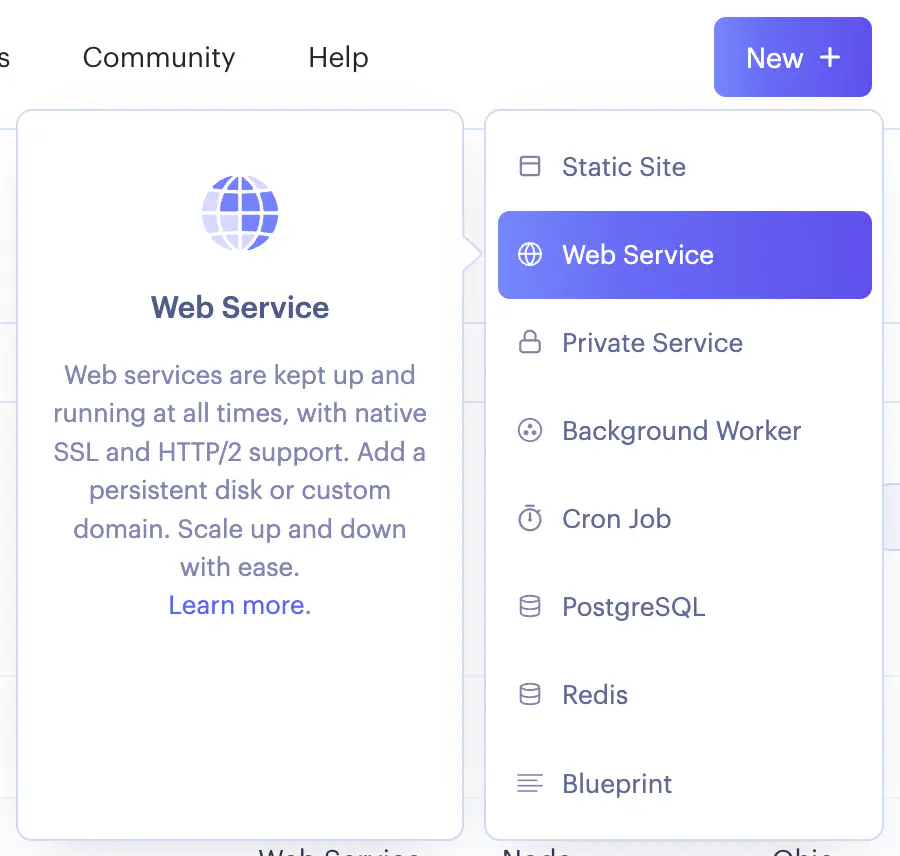
- In the Render dashboard, click “New +” and select Web Service.
-
On the next page, select the repo you want to deploy.
-
The next page is the configuration of the service. I’ve given descriptions for each parameter, but if you want an example of how they are applied to a real project, I have a sample MERN app with a config file that defines all the values for this page here that you can use as an example.
- Name: name your service whatever you like!
- Region: just leave as the default, or if you select a different region, be careful that other render infrastructure you create or use is in the same region.
- Branch: the name of the git branch you want deployed. Master? Prod? You decide!
- Root Directory: the root directory of the project- this will likely be where you run your package manager commands from. Do you have a single repo for your backend and frontend? No problem! The root directory for your backend will be the folder in your repo where your backend lives where you run your
yarnornpmcommands. - Runtime: Node
- Build Command: the command used to build your app (e.g.
npm run buildoryarn build), that runs in the Root Directory you specified earlier. - Start Command: the command to boot your app (e.g.
npm startoryarn start), that runs in the Root Directory you specified earlier. - Instance type: Free!
- Expand “Advanced”
- Add Environment Variable
- Set the key to be NODE_VERSION and the value to be the version of node you use. E.g.
16.13.1. This is important because Render will use the version of node you specify here to build your app. If you don’t specify a version, Render will use a version of node, which may not be compatible with your app! - Any other environment variables your node service needs to know about. If you haven’t hard coded your MongoDB connection string, this would be the place to set the environment variable that holds the connection string. Hint: look at any .env files you use and what’s there that need to be defined as env variables.
- Set the key to be NODE_VERSION and the value to be the version of node you use. E.g.
- Add Environment Variable
- Health Check Path: Render needs an endpoint in your app that it can make unauthenticated http calls to, to see if the service is alive. As long as the endpoint returns a 2XX or 3XX status code, that’s enough. If you don’t have a suitable endpoint, check out terminus as a super fast way to add a simple health check render can use.
-
Finish with “Create Web Service”
-
This will kick off the deployment of your node backend. Render builds your code and deploys it, so you can watch the status of its deployment.
-
In the overview for this service, you’ll see you’ve been given a URL:
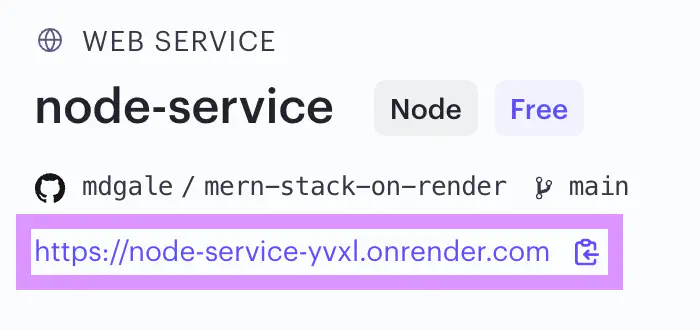
This is the URL of your node app that your React app is going to make calls to. If you hard code your URLs, this is the host you should use. If you use environment variables, we will create an environment variable when we set up the frontend service to set the backend URL. Note that regardless of the port your app runs on, Render configures the infrastructure to receive traffic over port 443 (https) and send it to the port your service is running on. So your app should just call this URL directly and not set a port.
Step 2: Deploy your React frontend
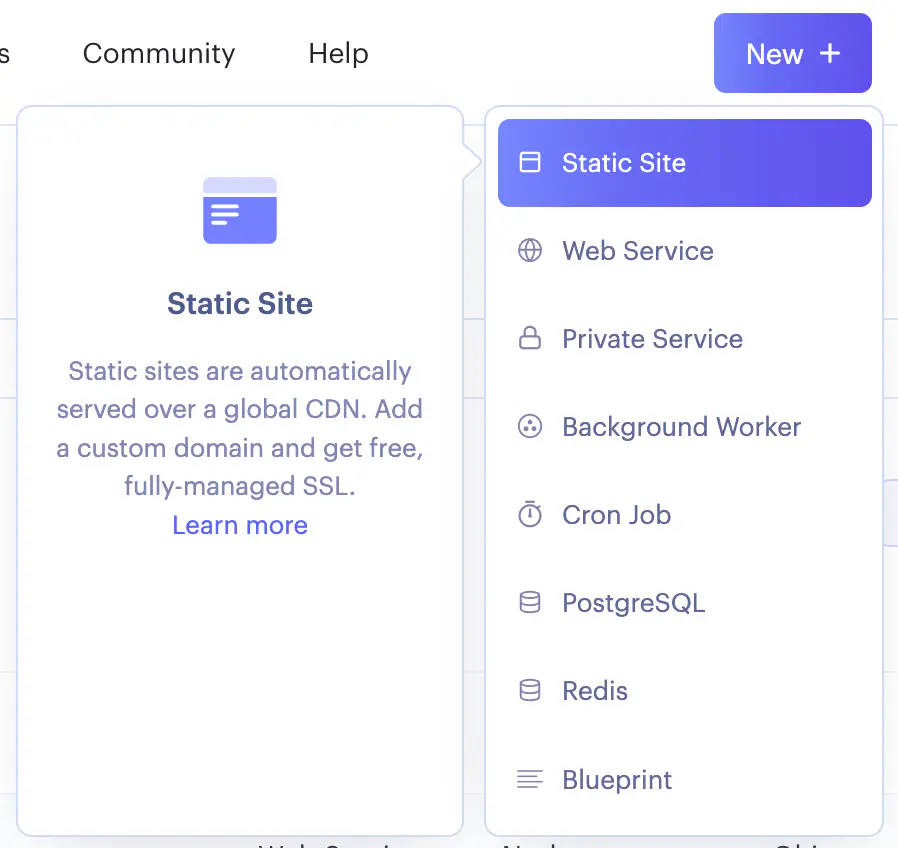
- In the Render dashboard, click “New +” and select Static Site
- On the next page, select the repo you want to deploy.
- The next page is very similar to backend service configuration:
- Name: whatever name you want!
- Branch: the branch you want to deploy.
- Root Directory: the root directory of the project- this will likely be where you run your package manager commands from. Do you have a single repo for your backend and frontend? No problem! The root directory for your frontend will be the folder in your repo where your frontend code lives where you run your
yarnornpmcommands. - Build Command: the command used to build the app for deployment, that runs in the Root Directory you specified earlier. For example
npm run buildoryarn build - Publish directory: the directory where the output files of your build process go. In many react project defaults, this is the
publicdirectory next to the package.json. - Expand “Advanced”
- Add any environment variables your app needs to run. Hint: look at any .env files you use and what’s there. If you use environment variables to set the URL for your backend, this is where you define it. Having environment variables that are prefixed with
REACT_APP_will expose them to your react app at runtime.
- Add any environment variables your app needs to run. Hint: look at any .env files you use and what’s there. If you use environment variables to set the URL for your backend, this is where you define it. Having environment variables that are prefixed with
- Finish with “Create Static Site”
- Click on “Redirects/Rewrites”
- Add a rule:
- Source:
/* - Destination:
/index.html - Action:
Rewrite
- Source:
- Save Changes
- Add a rule:
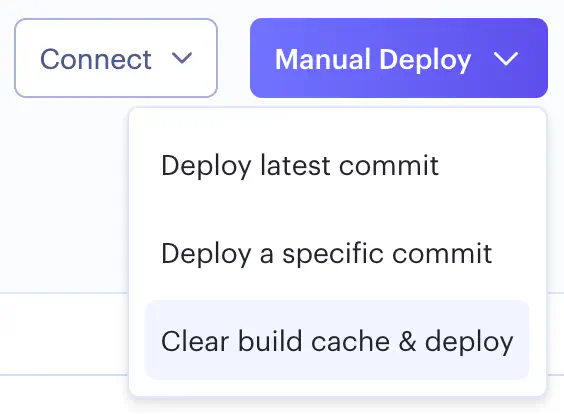
- Your React app is properly configured, but we’ll do a manual deploy since we updated the rewrites. Disregard the activity stream of events and deploys happening. In the top right corner, click on the dropdown “Manual Deploy”, and click “Clear build cache & deploy”:
- Wait for your React app deployment to finish.
- You’re all set! Visit the URL of your React app to see it in action.
If you’re stuck with any of the parameters during service configuration, remember to check the sample MERN app. The render.yaml blueprint has example parameter values for both the React and Node services, so you can key off of that to figure out your own parameters.
If you’re using another frontend framework instead of React, render has specific examples for how to configure routing for lots of frameworks, including Next.js or Vue.js.